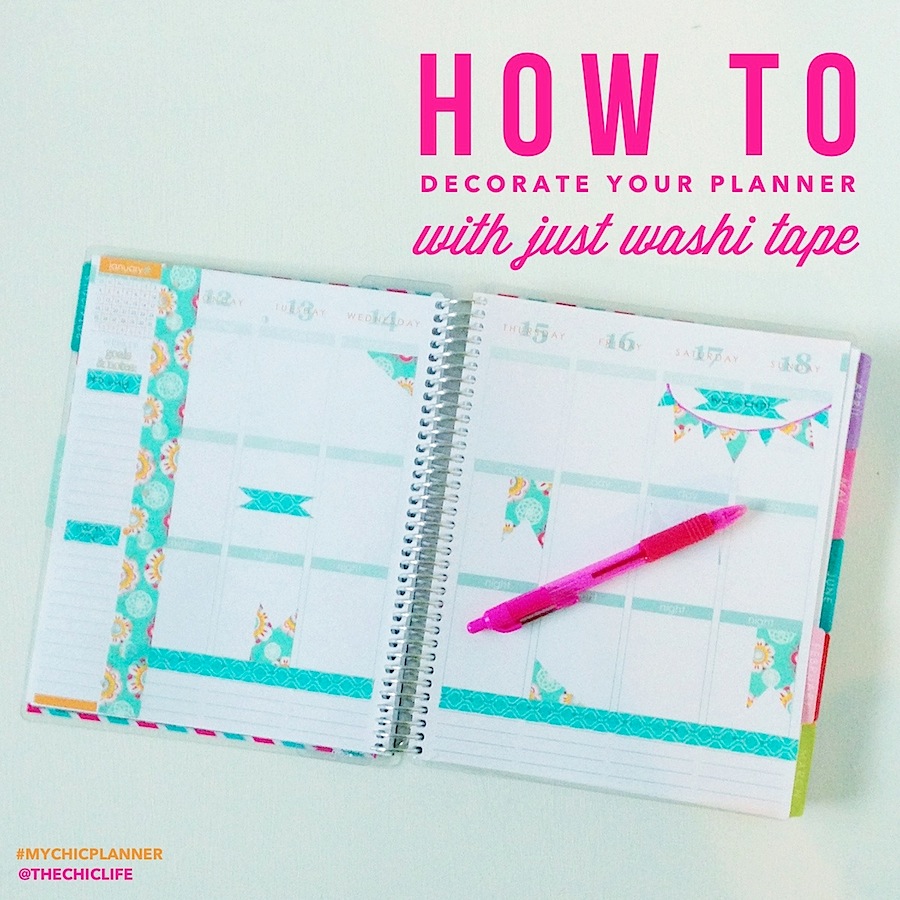
Whether you’re new to decorating your planner or you’re just browsing for new ideas, here are six easy ways to How To Decorate Your Planner with Washi Tape.
*NEW VIDEO* 6 Easy Washi Tape Ideas for Your Planner
Click here to view the video if the above player isn’t working.
Since this has been one of my most popular posts, I thought I’d make a video to go with it. Hope you enjoy it!
- More Planner Ideas: Click here for more planner tips and tricks
Please note: Some of the links below are affiliate or referral links. If you make a purchase after clicking on one of those links, I will earn a commission. I used and loved all of the items linked below and provided all the links in this post so you can easily find the supplies mentioned in this post. Please don’t hesitate to contact me if you have any questions.
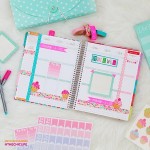
{I’m decorating my Erin Condren Life Planner (my fourth one!) in this post, but you could apply these ideas to other great options: Kikki K, Filofax, Kate Space, Passion Planner, and others.}
Overview
Especially if you’re new to decorating your planner, things can be a little overwhelming. There are so many great supplies you can use to add some zest to your planner: washi tape, stickers, scrapbook paper, stamps, post-its, etc. The options are endless, but the budget is (at least for me) not. I remember when I first started scrapbooking many years ago. I wanted one of everything. But, especially if you don’t already have a lot of scrapbooking supplies, things can add up quickly. I decided to experiment with a spread of my planner to see if I could decorate a week of my planner with just washi tape. And since washi tape is so versatile, I was able to get a lot out of just two rolls.
I was able to decorate my planner for less than $5 by using a two-pack of washi tape I found at Michael’s. With coupons/discounts, I paid $3.14 for the pair, but you could pay even less if you used one of those 50% coupons I see frequently. The full price at the time of this post was $4.99, so you could get it for only $2.50 plus tax. If you’re like me, you’ll probably want more color options and to eventually add other materials (stickers, etc.), but it’s good to know you can do a lot by starting/going small and simple.
And speaking of simple, I generally like clean layouts, but you could really add as much personality to your planner as you want. Go crazy. Experiment. See what you like. Layer the tape on, use several different colors if you want. It’s your planner, so you should do whatever makes you happy because that will make you use your planner and motivate yourself to stay organized.
What is Washi Tape?
Washi tape is a decorative tape that is very thin and lightweight and comes is a wide array of colors and patterns making it great for coordinating colors in your planner decorations. One of the best features of washi tape is that it’s repositionable. I don’t recommend ripping the tape up too quickly, though, since it can actually rip your paper. Yes, I learned the hard way, so just trust me on that one.
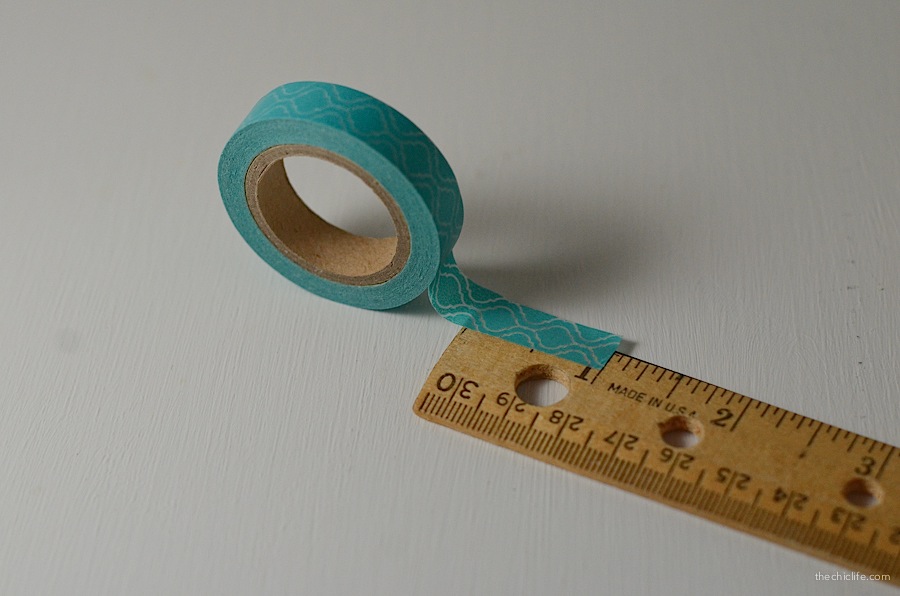
Washi tape comes in many sizes, too. The most common sizes I’ve seen are 10mm and 15mm. The size you want to buy will depend on where you want to place the washi tape in your planner. I’ll list sizes below for the areas I decorated. I generally like seeing the original labels, numbers, and other words in my planner, so I usually stick with the more narrow tape sizes to cover up less.
I’m planning to do a separate post/page of my favorite places to buy planner supplies, but I get most of my washi tape from craft stores and Etsy. It’s pretty easy to find. You can also check out my Planner Decoration Supplies page for more supply info and links.
- Related: Click here for my Top 5 Essential Planner Supplies
- Related: Click here for my picks for 10 Best Washi Tape for Your Planner 2018*
What You’ll Need
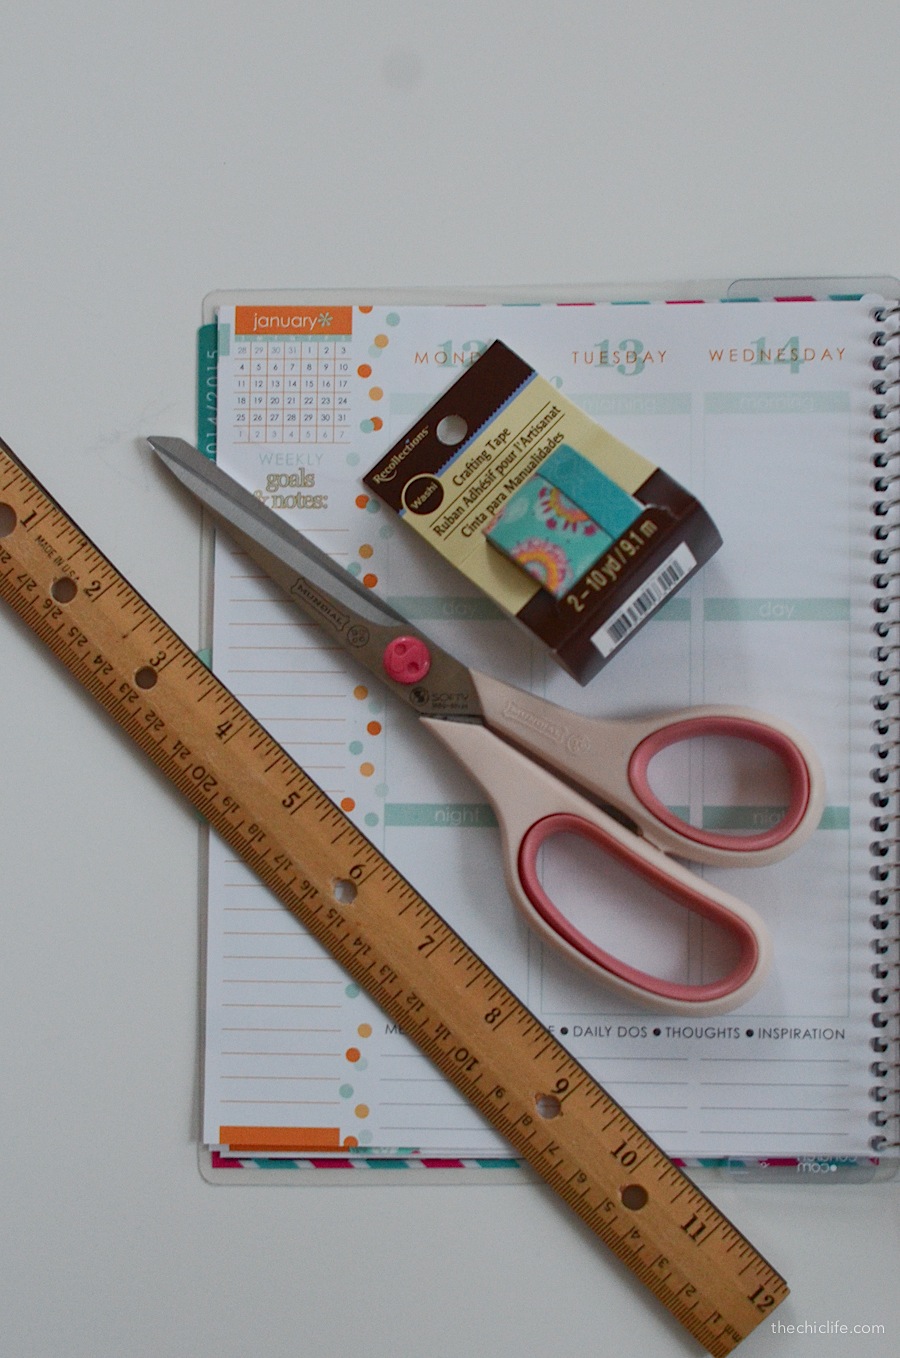
You’ll want to at least have:
- a planner: My fave is the Erin Condren LifePlanner:
- washi tape*: I recommend 2 coordinating colors at least, but even just 1 would work
- scissors: since posting this, I purchased a pair of 5-inch Fiskars scissors that I love – I got mine at Joanns with a coupon, but if you want to order it online I think it’s this – Fiskars 5 Inch Micro-Tip Scissors (94817897J)
(affiliate link) - ruler (optional for my fellow Type A-ers out there)
- *optional* color-coordinating pen(s): After reading comments from tons of fellow planner nerds, I kept hearing about the Triplus pens and bought a set. This set of STD334SB20A6 – Staedtler Triplus Fineliner Pens
(affiliate link) go with my planner almost everywhere. I love how there’s been a color to match almost every color scheme I’ve done this year.
*I’m using a two pack off washi tape with one 10mm and one 15mm in size. I recommend using sizes 6mm, 10mm, or 15mm for the ideas in this post, but you may find a different size works better for you.
Before You Start Decorating
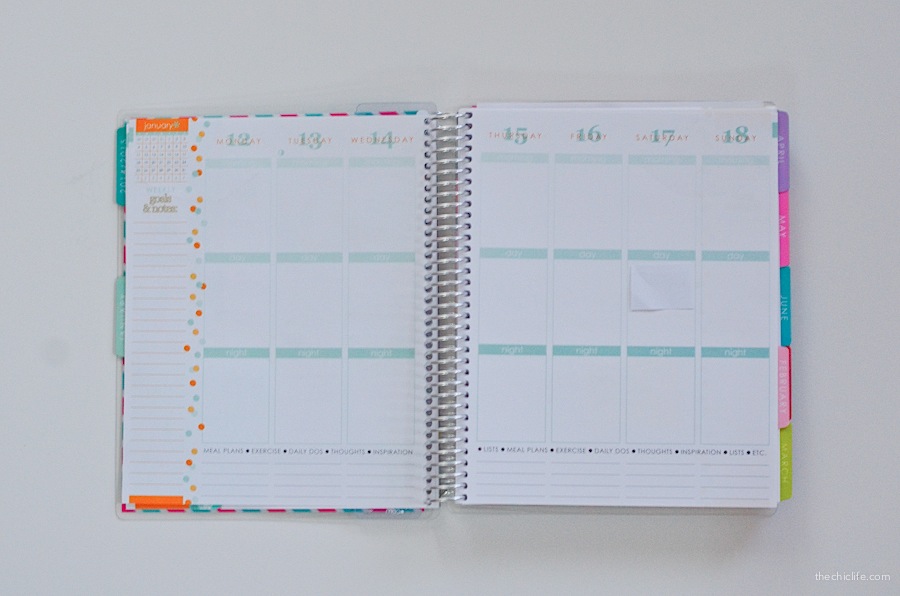
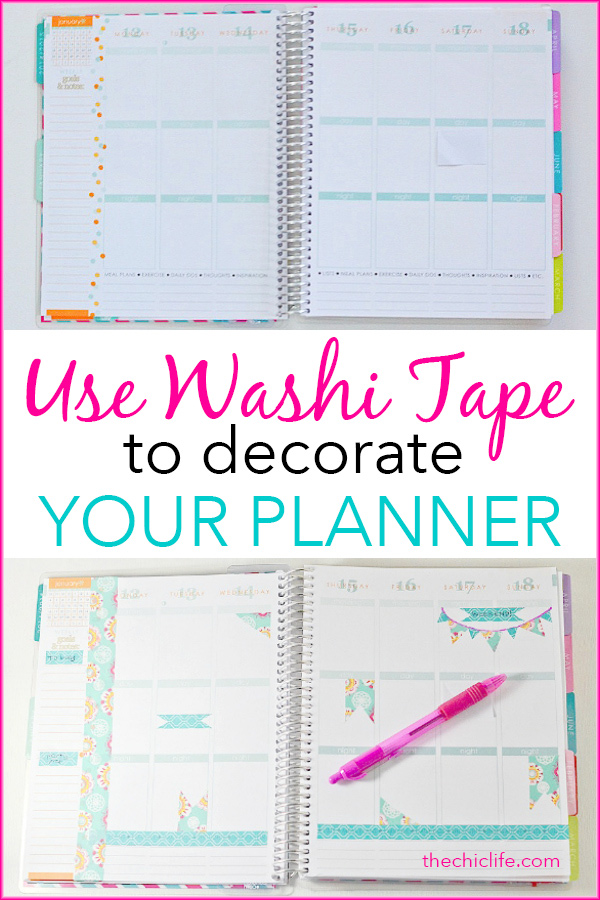
Here’s what the planner looks like sans decorations so you can see where I started.

Before I start dropping tape onto my planner, I like to measure around the planner to determine the best size washi tape to use in the areas I want to decorate.
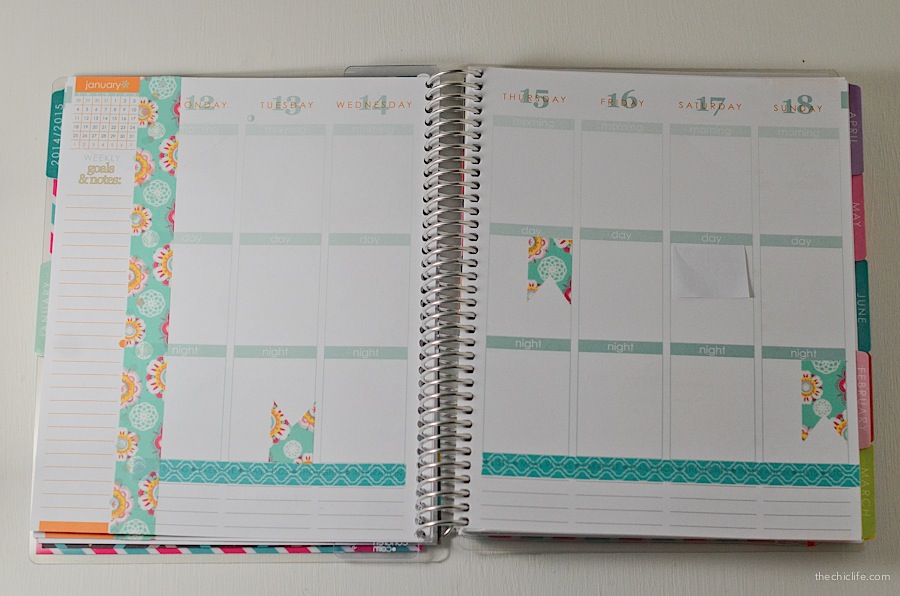
For example, one of the most common places to add washi tape is around the morning/day/night boxes, which is the main section of the weekly view. The washi tape is usually placed vertically on the left side to cover the polka dots and horizontally underneath to cover the “meal plans | exercise | daily dos…” line.
The vertical area is about 10mm between the top left calendar and the main box, but the polka dots reach wider than this, at about 15mm. I like to put 10mm or 15mm tape here. The 10mm won’t quite cover all the polka dots, but the 15mm will cover either some of your calendar or some of the main box, depending on where you place it.
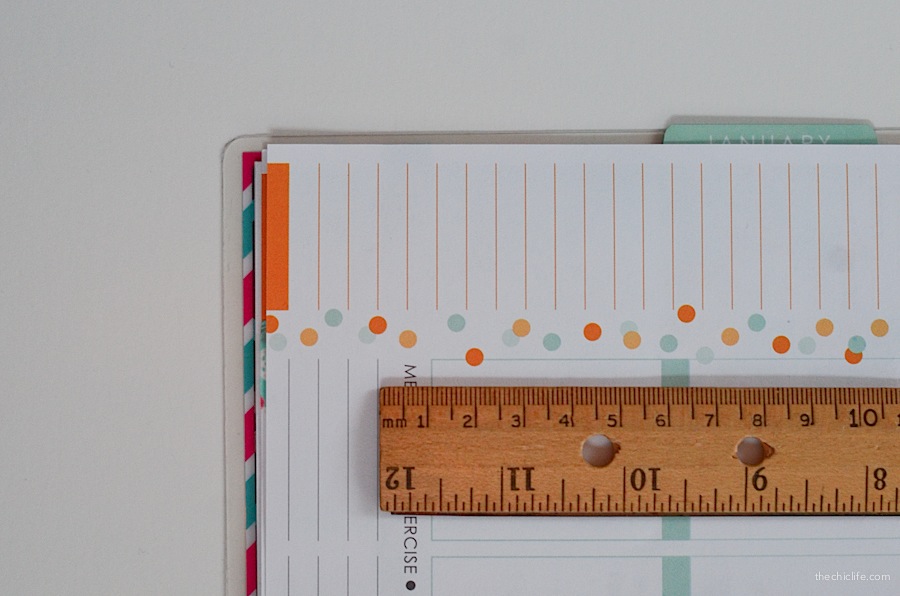
The horizontal area is about 10mm between the lines and the bottom of the main area, but you could use a really slim tape (6mm) to cover just the words. You could also use a much wider tape to cover the words plus a couple lines or even the whole lower section. I really like the lines at the bottom of the planner, so I try to cover up just the space between them and the main area with the 10mm tape.
It’s not really necessary to measure. You could eyeball it. But, I like to do this step to try to determine the best sized tape to use. At least until you get the hang of things.
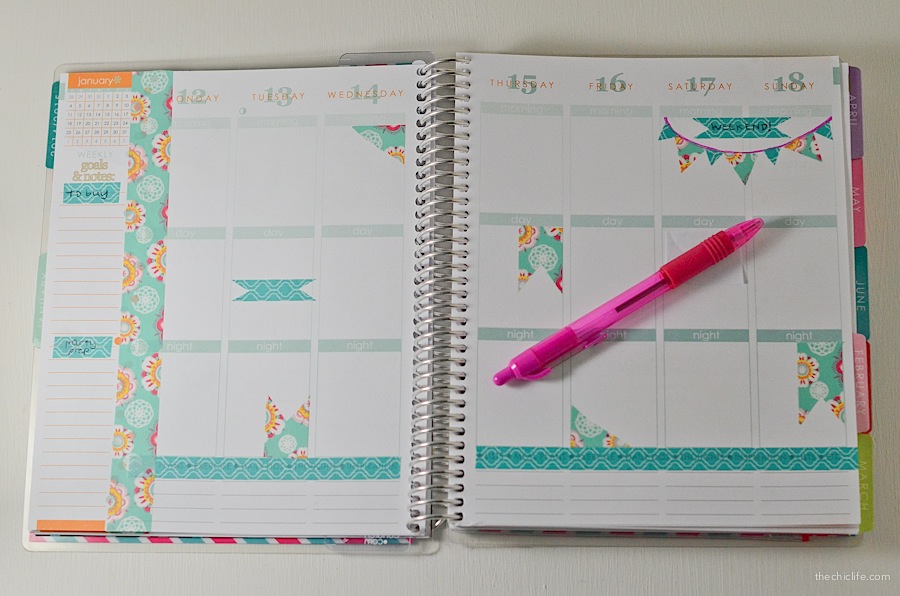
How to Decorate Your Planner with Washi Tape
Here are six examples of how to decorate your planner with washi tape. Be sure to pin or bookmark my Planner page, which I update all the time with links to more Planner Decoration Ideas and Plan with Me videos for more inspiration.
As I mentioned earlier, you can really decorate your planner to your heart’s desire. There are no rules to where you can or cannot put the washi tape. I’ve seen people cover all of the printed numbers and words with tape or just run the tape around the page borders. Remember to experiment and have fun with it. The following are just some ideas to get you started.
Let’s get started!
#1 Borders

Working with washi tape is pretty easy, especially since it’s repositionable. For long lines, like these borders, I usually like to attach the tape at one end. Then, I slowly lower the tape down from the starting end to the other end, pressing lightly as I go. I also try to ensure it stays aligned throughout. Once it’s down and lined up okay, I press the tape into the paper again to ensure it’s really attached.
For this layout, I put the horizontal (turquoise) tape down first because if there was any overlap, I wanted the vertical tape on top. Then, I added the vertical (floral) tape vertically down the left side, covering the polka dots. If you use the 15mm washi tape as I did, you’ll have to decide whether you want some of that top left calendar or the Monday column covered. I went with the latter.
If you like a more minimal look, you could stop here (or skip the borders altogether), but I wanted to spread the color throughout the page more.
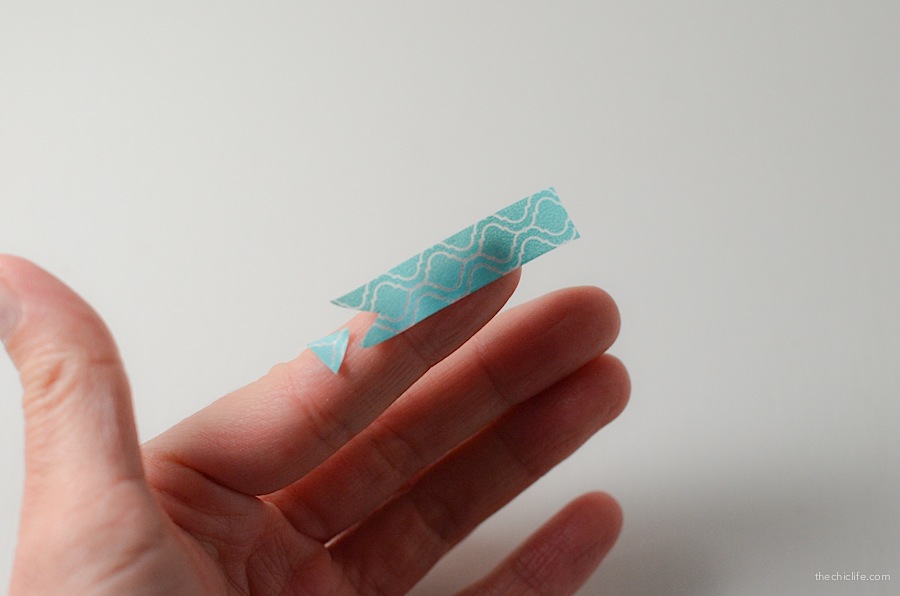
#2 DIY Page Flags
Have you seen all the amazing handmade planner stickers there are on Etsy? I have some and will blog about my faves another time. Page flags are one of the most common sticker shapes I see (besides the obvious circles, squares, etc.) for planner materials. Many great Etsy shops offer them with words and cute graphics like this one or even blank so you can write on them. While I am planning to use some of those stickers, it’s good to know you can also make your own page flags with washi tape.
To make them, simply cut a rectangle out of the washi tape and then cut a triangle* out of the short end of one side. You can place them any direction you’d like. Most page flag stickers seem to have the pointy ends pointing down, but place them as you like. I used a really patterned tape that isn’t ideal for writing words on. I’d probably need to use bold lettering to make the words really readable. In this example, I used the tape more to bring some of the color from the left side of the planner to the right side. I put two page flags on the right and one on the left to try to balance the floral tape across both pages.
*NOTE: Save those leftover triangles! We’re going to use them in the next example. I don’t like wasting materials, so I’m always trying to think of ways to use up scraps instead of throwing them away.
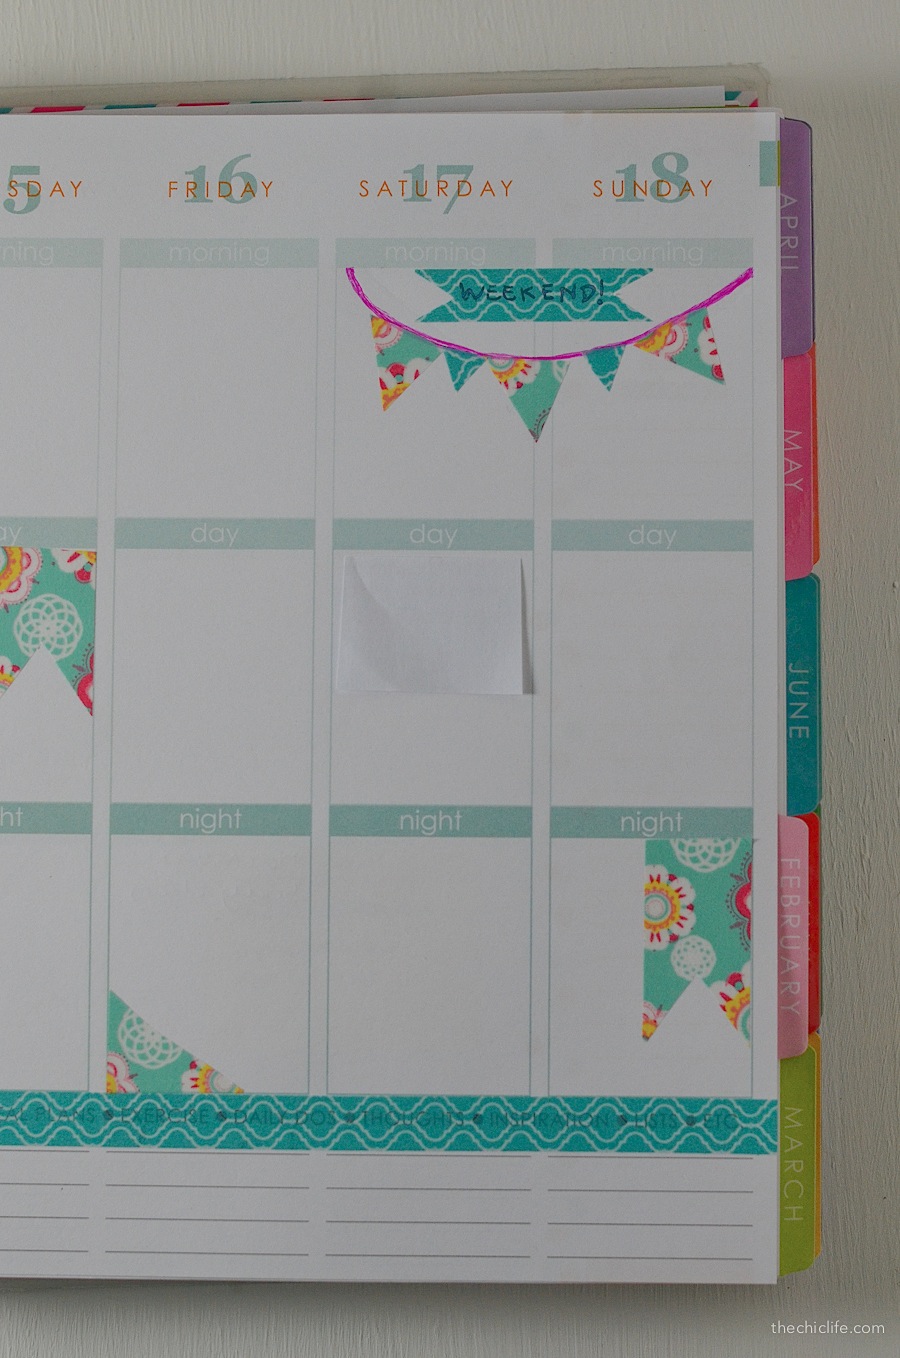
#3 DIY Weekend Banner
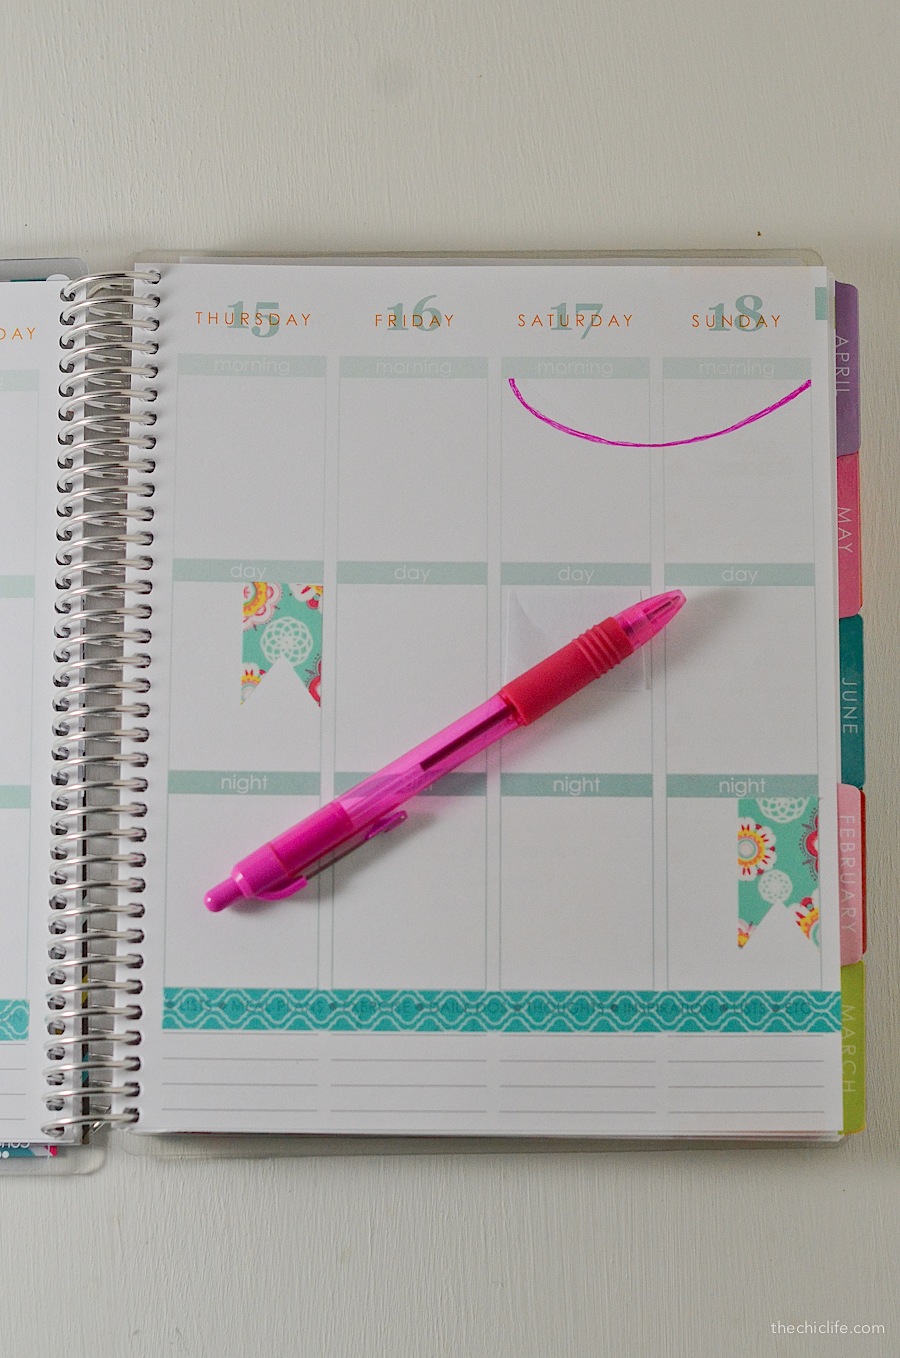
Another popular planner sticker is the weekend banner, like this one (I really want to order this one soon). There are non-weekend banners and single day banners, but the weekend one seems most common.
I got the idea to make a banner with washi tape from Belinda (check out her site and YouTube for some other cute planner ideas). But, instead of using page flag shapes, I decided to use the leftover triangles from the DIY page flags I added to the boxes.
To make the DIY weekend banner, use a color-coordinating pen to draw a line from the top left corner of the Saturday column to the top right corner of the Sunday column. You may wish to make your curve less swoopy and more flat so the tops of the triangles line up better.
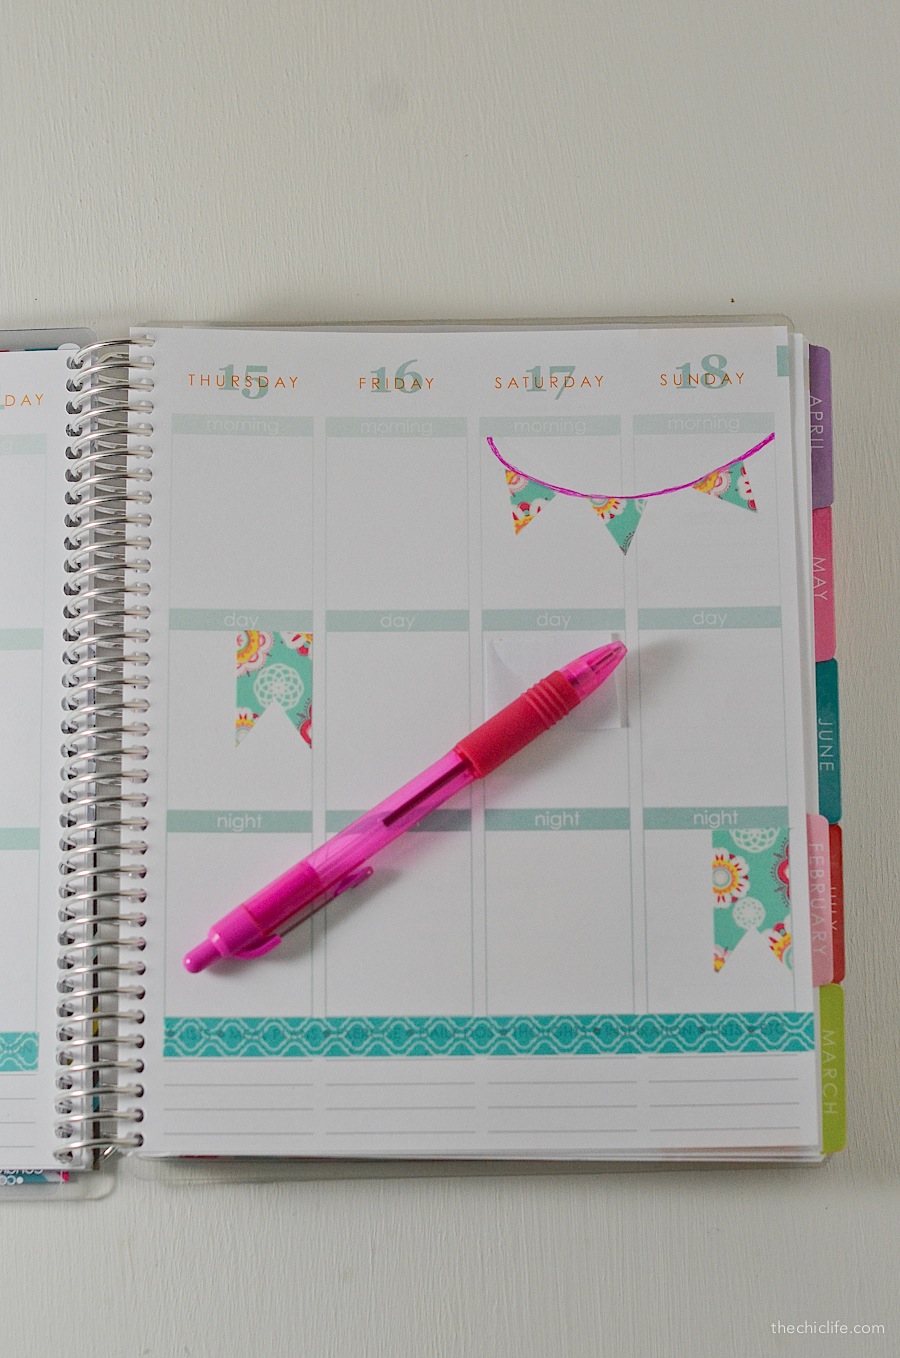
Add the triangles so the edges line up with the line you drew, evenly spreading them.
#4 DIY Labels – Left Column
You can add a little color to the left side of the planner without covering up too much by making some simple labels. I used a ruler to measure how wide I wanted them since I didn’t want to cover the paper from the edge of the paper to the vertical tape border. This helped me make sure each label was the same size.

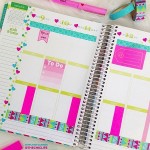
Add the tape to the left column, spacing them vertically as you like (in case one list/section needs more space than the other). You can use these to simply divide the space. Write some words on the tape (“To-Do”, “To Buy”, etc.) to create a label instead of using them as space dividers.
#5 DIY Labels – Banners
To pull some more of the color of the turquoise tape throughout, I created a couple simple banner labels. To make these, simply cut a rectangle out of the tape and cut a small triangle out of each side. You can also reserve these triangles to add to your DIY weekend banner, if you’d like.
You can also add words to these. I used one for “Weekend!” and one for “Party!” (forgot to write the last one in before I snapped the next photo).
#6 Shapes
I guess this one is pretty obvious, but you can cut all kinds of shapes out of washi tape to just add pops of color here and there. I cut a couple short rectangles and then cut them in half on the diagonal to make some triangle shapes. You could use these as labels or just for decoration. I used mine to distribute the color a little more. You could also use punch cutters, etc. to make even more shapes. I recommend putting the washi tape on something else before using a punch cutter, though. Since the washi is repositionable, you could probably use any paper. I’ve seen others recommend using something the tape will come off of more easily, like vellum or wax paper. I haven’t tested either of these out yet, but they make sense.
All Decorated
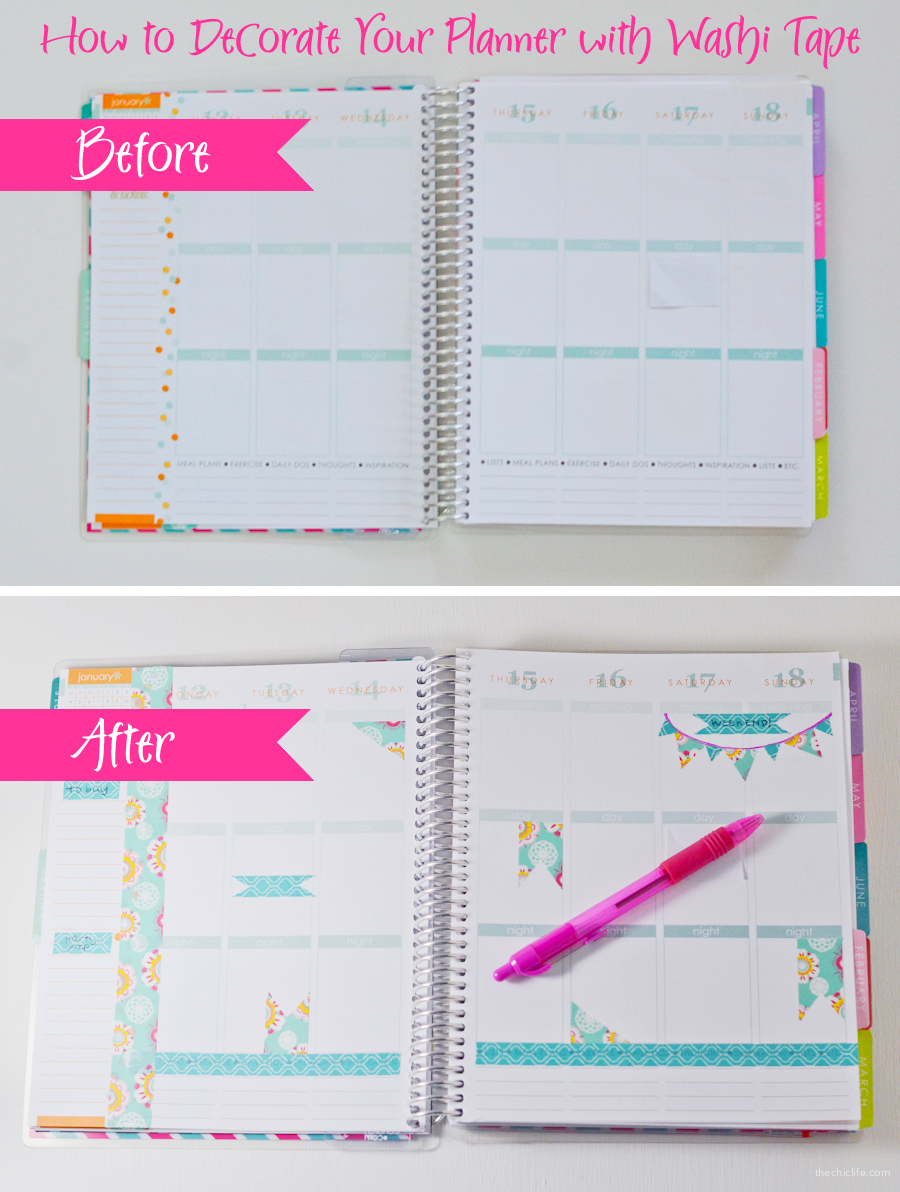
Anywho, here’s the finished product! I used color-coordinating pens to add in my notes for the week, and I’m really loving the color scheme. It not only makes me smile, but it keeps me on top of things, too.
Buy Washi Tape Online
Here are some cute washi tape options online:
- AllyDrew Pretty in Pink Japanese Washi Tapes Masking Tapes
- Crafty Rabbit Geometric Washi Tape – Set of 8 Rolls – 262 Feet Total – Multicolor
- me & my BIG ideas Washi Tape Tube, Peony Florals
Click here for my 10 Best Washi Tape for Your Planner 2018 post
More Planner Decoration Ideas
 Be sure to check out my monthly planner recap posts. I’m sharing photos of every single layout I’ve done. You can see them first on Instagram (follow me at thechiclife). But, I’m posting additional details here on my blog on my Planner Decoration Ideas page.
Erin Condren Discount Code
I’ve been using the Erin Condren LifePlanners for the last four years, and I absolutely love them. I haven’t seen Erin Condren discount their Life Planner in a long time. But, they do have a great referral program (open to anyone, not just for bloggers). If you’re interested in getting the planner photographed in this post, check out the Erin Condren Life Planner. You can save $10 by using my referral link and signing up for an account. If you use my referral link, I’ll also get a little credit, so we both win. 😉
Plan with Me Video
Want to see how I decorate my planner? I made a video about one of my weekly spreads. Click here to check out my Plan with Me: Hyperbole and a Half Theme (including a *free* printable).
You can also check out my Planner videos on my YouTube channel under username thechiclifeblog.
More Planner Tips and Tricks
 Click here for my main Planner page with links to more great planner tips
Click here to learn how to make a DIY Weekend Banner with Stickers
Click here for my tips for Planning While Traveling
Click here for my Top 5 Essential Planner Supplies
More Planner Inspiration
If you want to see what others are doing with their planners, check out some of these hashtags on Instagram:
- #erincondren
- #ecplanner
- #plannernerd
- #planneraddict
There are many more, but these will get you started, and then you can find others to also check out. There are so many creative planner lovers out there. I just love seeing what everyone is doing with theirs.
Erin Condren has a really active Pinterest account, and they’re always posting photos from their customers. A couple of mine have made the boards even! Click here to check out the Erin Condren Pinterest page.
 I’ll be posting photos of my planner decorations and planner supply hauls on my Instagram account @thechiclife, but I also usually repost these to my Twitter and Facebook accounts if you use those instead. You can also check out my Planner videos on my YouTube channel under username thechiclifeblog.
***
What’s your favorite way to use washi tape? Do you have any tips I should try with my washi tape? Let me know in a comment!
Thanks for stopping by!
Did you like this post? Why not share it with your friends using some of these shareable graphics:
Oh em gee. Ok, so not only are we both Diana but you just blogged about something I’ve been wanting to blog about since November. And you’ve done it 100X better than I ever would so hey, win win for everyone! Am I right, or am I right? 😉 Lol!
I have moved on from EC planners tho and am now teetering on the line of obsessively collecting all the Filofaxes I can find. Ok, ok, I’m lying. I can only speak for the Maldens but yeah. Ha.
Hi Diana! You should still do your blog post! I know you wanted to do it in November, but it’s never too late, and I’m sure you have some great ideas that others would like to see! I’ve been seeing all the cute planners on Instagram, including the Filofax. I’ve been checking out the hashtags I listed above, and there are some cuuuuute planners and decorations out there! Thanks for stopping by! 🙂
Love this…simple…inexpensive…right up my alley. I’m going to try the weekend banner for next weekend!
Made a banner last night using your idea. I posted a picture on FB (we love EC and Erin Condren Fans) with a link to your page…but couldn’t remember which site I had found the link on so just wanted to let you know 🙂
Hey Kirstin! I found your post in the FB group. Looked great! Thanks so much for checking out my tutorial! 🙂
Thank you so much for this tutorial. You are right about becoming overwhelmed. I want every washi tape I see. Plus, I am totally green when it comes to decorating. This is an excellent guide to get started. Thank you much.
Hi Tasha, Glad you found the tutorial helpful! Welcome to the washi addicts club! lol. I just uploaded a new post about planner decorations that could give you some more ideas: https://thechiclife.com/2015/04/life-planner-decoration-january-2015-weeklymonthly.html Thanks for stopping by! 🙂
Thank you for the link. Those look great also. I found the same washi tape combo at Michaels. I used Joann’s 50% off coupon. So, it was a steal for $2.49. Plus, I took my sons (3 of them!) with me so I could use multiple 50% coupons at one time. Bargain! Now, I gotta get started and stop drooling.
What types of pens or markers do you use to write on your washi tape? Mine always seem to smudge 🙁
Hi Courtney, I used a ball point pen (the type that is not so liquidy) in this tutorial, but a fine sharpie would be great, too. The sharpies tend to stand out a little more. Just make sure to let the writing dry before touching. Thanks for stopping by! 🙂
Loved this! I’m finally getting around to embellishing my Sugar Paper planner. I like a clean layout as well. Washi is SO versatile! Can’t wait until 2016 planners come out – I have so many ideas now!
I’ve been looking for ideas to decorate my new Erin Condren planner. Most of the “plan with me” videos that I’ve watched have phenomenal results, but used so many stickers and such that it was cost prohibitive. I love these simple and inexpensive hacks that give you a personalized look without breaking the bank! Thanks for posting.
Hi Lois, So glad you found this helpful! I’ve been making plan with me videos, but mostly with lots of stickers. I should do one with just washi tape! 🙂
OMG! I seriously NEEDED this. I’ve been trying to stop buying stickers because it gets expensive (because I get addicted) and I’m trying to be more practical with my planning. But it’s been so plain looking it makes me sad. Washi tape is just so much more affordable over time. And with my color-coding system and pens it’ll be perfect! Thanks so much for this! I literally just googled something and found you off of google. haha.
I love it Diana! How you did it!
Hi I’ve just started my very 1st planner and journaling book.and want some washi tapes and some matching stickers to match the washi tape.and pretty flowers and some tiny squares for budgeting money monthly and our bills and finances.as we are interested in journaling and planning and budgeting and saving money and getting current with things.