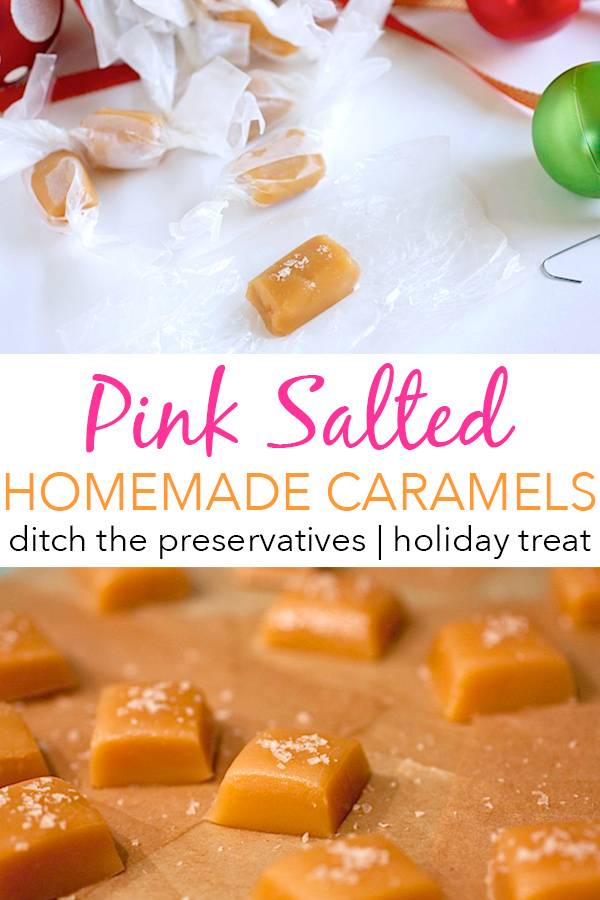
When I first heard about salted caramel candies, I thought it sounded totally gross. I know people love the whole savory-sweet thing (myself included on a rare occasion), but I wasn’t getting why people would put straight up salt on a piece of candy. Maple syrup on sausages…okay. But salt and basically sugar together in one bite? As it turns out, I’m a fan and making this Pink Salted Chewy Caramel Candy Recipe was pretty simple and definitely tasty!

Of course, it wasn’t long before I had caught on to the salted caramel trend. One bite and I was sold. Popular eats are typically not popular without reason, so I quickly caught onto what everyone was raving about. I found the strangely delicious combo of salted caramel heavenly. So unexpected…so divine.
It was no wonder that when I decided to jump into the wild world of candy making that salted caramels were my first choice.
I tried this recipe by The Kitchn and had pretty good success at my first attempt. The second however, did not go as planned, though I don’t blame the recipe…I now blame my candy thermometer. See, after my second batch came out rock hard, I googled to find the reason for my botched caramel attempt. Most suggestions mentioned something about cooking too long or to too hot a temperature, but I knew I had very closely monitored my temp, so it must have been something else.

When I stumbled upon a tip to check the calibration of my thermometer, I thought it was a waste of time. But since I didn’t know what else was wrong with my botched caramel making attempt from before, I decided to give it a go before trying my third batch. To my surprise, the candy thermometer I was using read 175 degrees F in boiling water while my instant read thermometer read a closer to correct 211 degrees F. No wonder my second batch came out so wrong! I can’t believe I got something usable out of the first batch!
With a reliable in thermometer on hand, I decided to try out homemade caramel candies again…this time making up my own recipe based on internet research and the proportions of this recipe.
See, when I was researching, I found many instances of caramel recipes that threw all ingredients into a single pot, unlike the 2 The Kitchn recipe used. Since I’m not a fan of cleaning extra pots, I decided to go with that method. I still wanted to keep the size to something I could put in an 8×8 casserole dish, thus the proportions I utilized. I also found differences in final cooking temperature, but most varied between 245 and 250. I decided to play it safe and stick with 245 so I didn’t experience slab-o-caramel again. The recipes varied quite a bit with types of creams, fats, and sugars, but I decided to stick with the ingredients that seemed most traditional and simple. After all my research, I was extra comfortable embarking on a third caramel candy making adventure. 🙂
Here’s what I did…
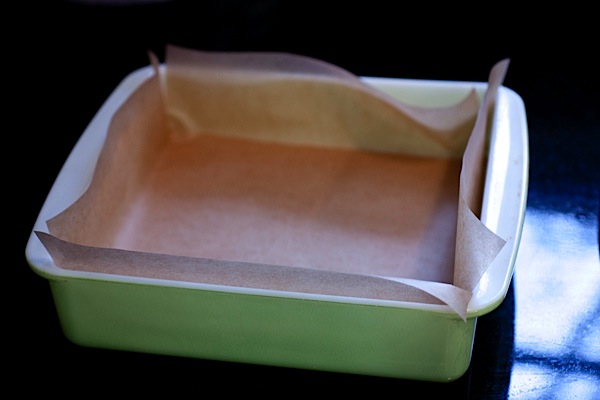
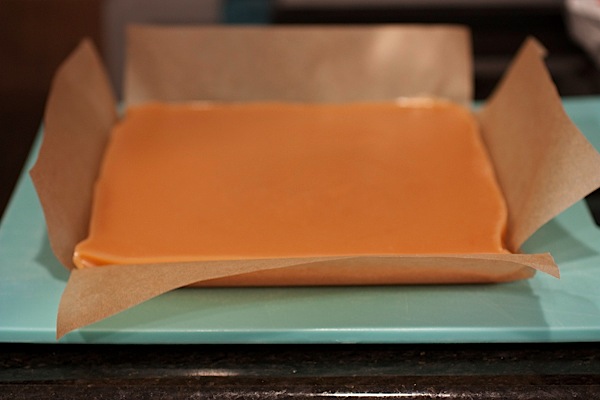
I lined my 8×8 dish with parchment paper. Be sure to line up both sides using 2 sheets of parchment. If you don’t (and I made this mistake on my first attempt), the caramel will be extremely difficult to remove from the sides of the pan. Don’t skip this step.
This recipe is simplified to allow you to put all ingredients into a pot at the same time.
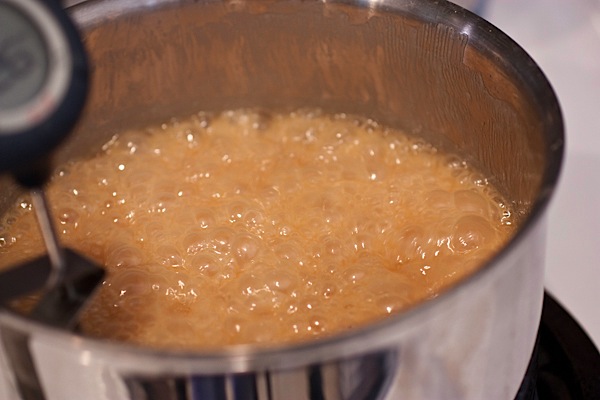
When the mixture boils, it will rise quite a bit. Use a pot that is at least 2 times as large as your liquids, but more like 3 will be safer. The temperature will most likely waver around 222 for quite some time, but I found when it started raising in temperature, especially closer to the end of the cooking time, the temperature jumped faster and faster! Watch your candy thermometer!
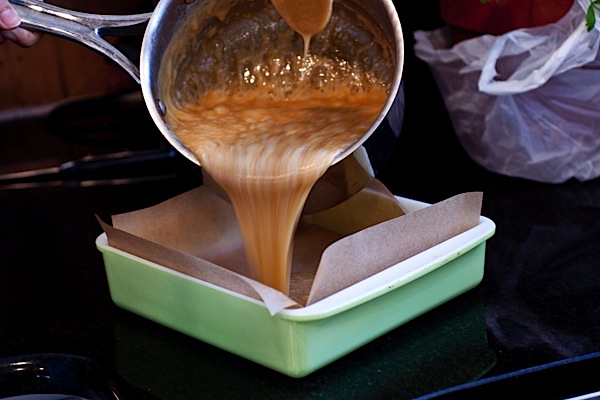
Once the mixture reaches 245 degrees F (using your calibrated thermometer), remove from heat, stir in vanilla. Then, pour into your baking dish. Cross fingers and hope for the best.
Let it rest at room temperature for 3 hours.
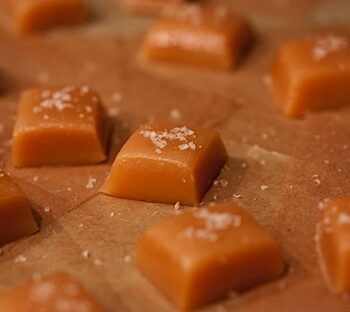
After patiently waiting, remove your caramel candy from the baking dish and cut into small pieces. Most recipes recommended 1 inch pieces, but I found a slightly smaller cut to be easier to eat and yields more servings.
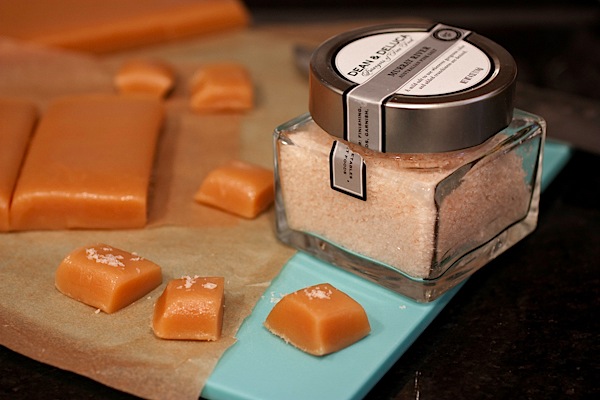
I used pink salt because I thought it looked the prettiest. It also reminded me a bit of the candy I reviewed from Theo awhile back. But you can use almost any salt you want, just be careful of the flavored ones. Dean and Deluca had quite a few options but most grocery stores will at least have a coarse fleur-de-sel type of salt, which is what you want (not table salt).
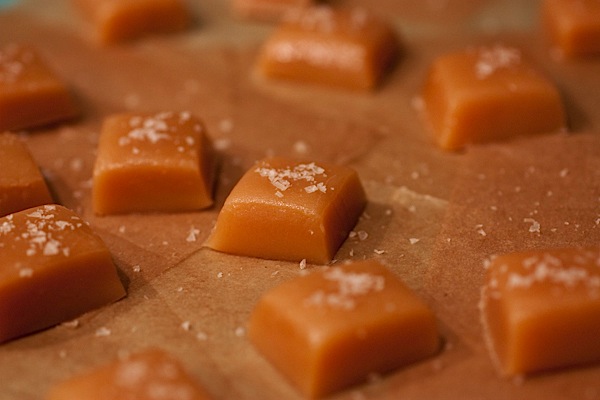
Sprinkle the tops of the caramel with a bit of salt and press salt gently into the tops.
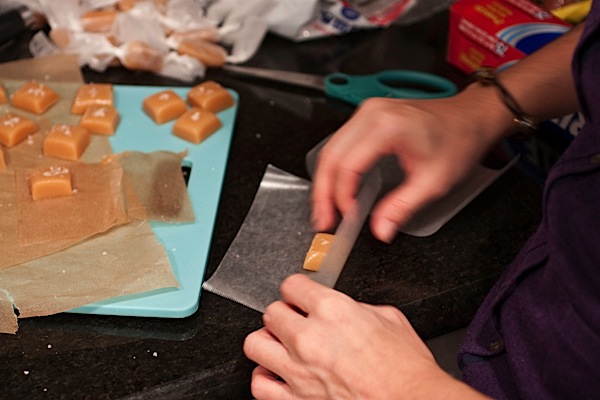
You can put the candies into individual paper cups or wrap them in small pieces of wax paper.
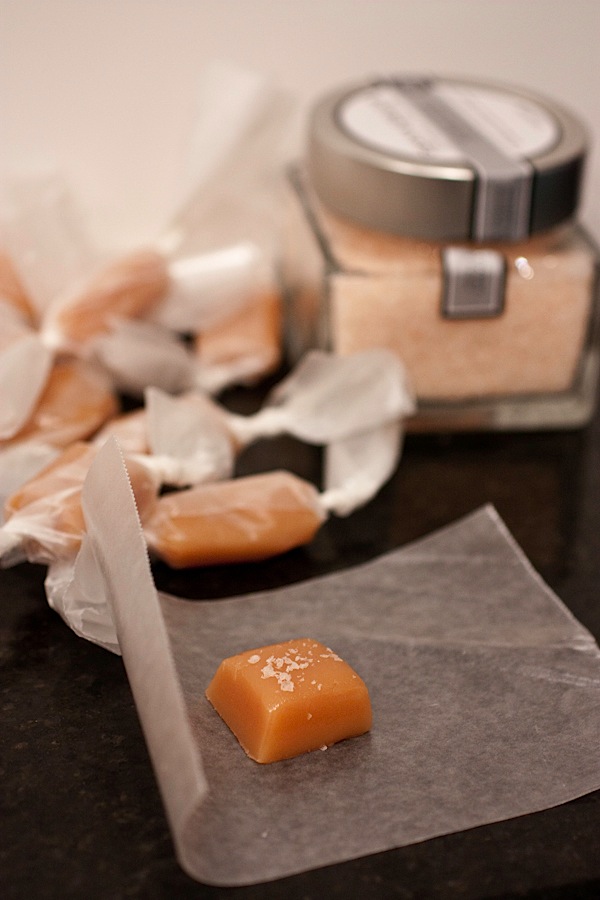
I liked the wax paper because it was easier to package.
Pink Salted Chewy Caramel Candy Recipe
- Category: Dessert
Description
These chewy caramels are easy and a great first-candy-making experience. They also make a great gift. Wow your friends by using a fancy salt and labeling your candy so it sounds extra chic. Inspired by this recipe by Live Laugh Eat who adapted it from this recipe.
See photos and notes above for some helpful tips.
*Vegetarian*
Ingredients
- 2 cups heavy cream
- 1 cup sugar
- 1 cup brown sugar
- 1/2 cup corn syrup
- 1/2 cup butter (1 stick) cut into 1 tbsp pieces
- 1/4 tsp table salt
- 1/2 tsp vanilla
- coarse salt like pink salt or fleur-de-sel for topping caramels
Instructions
- Prepare an 8×8 casserole dish with parchment paper, ensuring to cover up the sides of all 4 sides (see photo above), using 2 sheets of parchment paper criss-crossed.
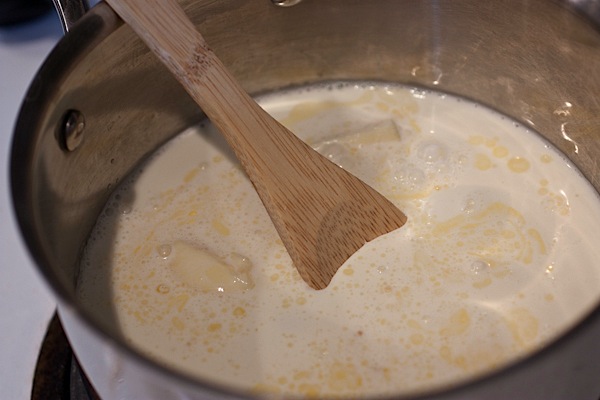
- Combine the first 7 ingredients (heavy cream through table salt) in a medium pot (should be about 2 to 3 times as large as your total ingredients because the mixture will grow as you cook it). Insert candy thermometer into mixture (I believe you want to avoid allowing the tip of the thermometer from touching the bottom of the pot). Turn heat to medium high and bring to a boil, stirring frequently to ensure sugar crystals dissolve completely.
- Once mixture reaches a boil, turn heat down to medium and do not stir any further. Instead, use handle to gently swirl mixture in pot occasionally. Cook mixture until it reaches 245 degrees F (roughly 20-30 minutes, but it will depend on your stove heat and vary quite a bit). Monitor your temperature closely, especially towards the end of cooking.
- Once the mixture reaches 245 degrees F, remove the pot from heat, gently stir in the vanilla and then pour mixture into your prepared baking dish.
- Cool at room temperature for 3 hours or until set.
- Cut into small pieces (I cut mine into just under 1 inch pieces, about 2/3 inch – I eye-balled the sizes).
- Sprinkle tops of caramels with pink salt of fleur de sel. Gently press salt into the tops of the caramels.
- Place candies into individual paper cups or wrap in small pieces of wax paper.
- Enjoy!
Notes
Be sure to read the blog post and check out the photos for additional tips.

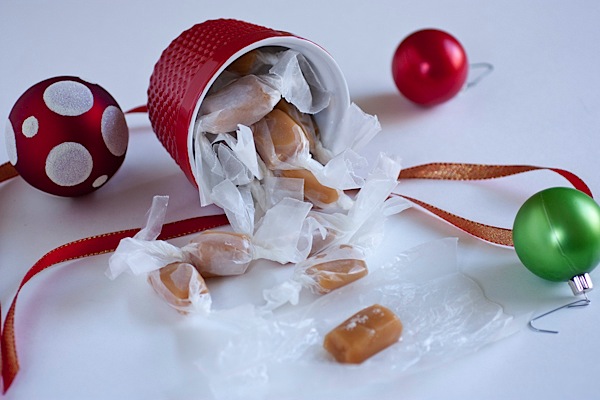
Handmade caramels make a wonderful gift any time of year!
***
Pinterest review:
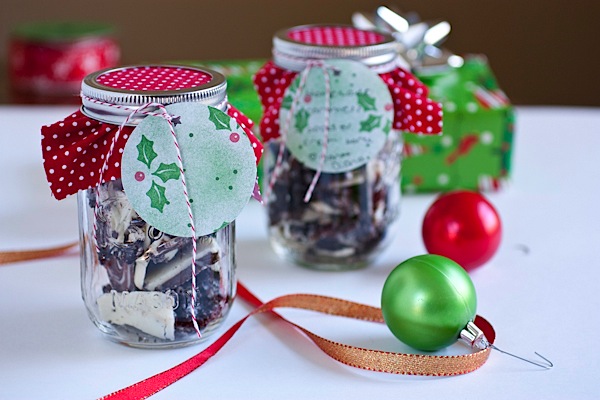
Check out my Cookies ‘n Cream Bark Recipe and a fun holiday packaging idea with mason jars! Hope you enjoy the Pink Salted Chewy Caramel Candy Recipe.
Do you like salted caramels? Any other savory-sweet combos?
Here’s a shareable graphic for your Pinterest!
I love salted caramels so much and these look absolutely divine. I tried my first salted caramel at Starbucks and was hooked ever since. These look awesome Diana!
I didn’t even know Starbucks had salted caramels! Were they like candies or something in the baked goods group? Thanks!
Starbucks actually have Salted Caramel Hot Chocolates! Delicious!
I just love caramels in general! I’ve tried two recipes (the first one was the same you used), and both were failures. They wouldn’t hold their shape for me to cut. I’m wondering now if it’s the ancient candy thermometer. Maybe that’s what I’ll buy first thing on Sunday if I don’t get one from Santa. I hate wasting expensive cream on failed projects! I’ll give this new recipe of yours a try.
I would definitely recommend calibrating your thermometer. It sounds like your caramel didn’t reach a high enough temp to reach the thicker texture. You can also try pouring a bit of the liquid caramel (while you’re still cooking it in the pot) in a small cup of cold water. Check the consistency of the caramel by pulling it out of the water – it will show you what your caramel would be like if you stopped cooking it at that point. That’s apparently how old-school candy makers used to make caramel! 🙂
WoW! I just finished making these and I want to eat them now!!! I don’t want to wait for them to cool!
Those are too cute! And I loooove the salted caramel flavor pairing!
Sea salt is great for this sort of thing! 🙂 It’s especially good for dark chocolate.
I totally wanted to dip some in chocolate. Actually, I wanted to do that with the first batch, but then I got lazy. hehe 😉
I’ve never had salted caramels but now I think I will try them sometime
I am coming over and inhaling them..omg..they look amazing.
Come on over! 😉
They DO make a wonderful gift! (if you don’t eat them all first like me hehe). Your set up looks beautiful, Diana! Happy Holidays to you, the hub, and Bailey.
Thanks Allie! Happy Holidays to you and your fam, too! 🙂
This recipe makes me really wish I didn’t have a debilitating fear of candy thermometers.
They’re not so scary. 🙂 Maybe this would be a great recipe to try – it’s pretty easy!
I made some with sea salt and some with smoked salt. Both absolutely delish!
Ooh that sounds tasty!
This looks like such an easy way to make caramel. I’m definitely going to make it real soon! Thanks for posting!
You’re welcome! 🙂
Well, I tried it this afternoon, and it seems I have a faulty thermometer.
It tastes really nice, but it didn’t ever set. Now it’s going to be used as a lovely ice cream topper.
Oh no! Sorry Monica! 🙁 That’s very frustrating. At least yours didn’t turn into a block like my messed up batch. I couldn’t do anything with that. You could also consider using it on top of a batch of brownies. 😉 Try calibrating the thermometer or getting a new one. Happy New Year!
I just wanted to let you know I just tried these and they came absolutely delicious! I am a first time candy maker so I was super nervous, but thankfully they were a success. Thank you for sharing this recipe. 🙂
I got really inspired looking at this post! They sound and look so gorgeous.
My caramel was quite oily though. Because I dont have butter in sticks, I found that the converted amount in tablespoons were 8. It has a very oily finishing and taste quite greasy too. Did this happen to yours?
Hey Ping, Glad you like the post! 🙂 I don’t remember the caramel being very oily, but maybe you could try making the next batch with 1 or 2 tablespoons less butter next time? Or I wonder if less corn syrup would help? Hope that helps!
there is a mistake in the recipe! it says in step 2. to combine the first seven ingredients, heavy cream through table salt, but that is actually six ingredients. I added the vanilla at the beginning because it was in the first seven ingredients! Just a little thing, but it would help if that was edited!!! Otherwise, great simple recipe!
thanks, they are good!!! 🙂
You’re welcome! 🙂 Glad to hear!
How do you cut this without them sticking to the knife?
I don’t think mine stuck terribly, but you could probably try spraying your knife with non-stick spray or possibly dipping it in hot water before each cut.
I love love love this recipe of yours, but of course i had to tweak it a lil, now im just waiting for it to cool now! soo excited! thanks, mzz robinson
Hope you like it! Thanks! 🙂
This recipe has me craving caramel now! Did you use the really pale, medium or dark brown sugar?
Thanks!
I think I used light brown sugar. 🙂 Happy cooking!
I just poured it into the pan and it looks like the butter and the mixture seperated…..is this normal? I followed the recipe exactly!
Ugh, i hope they turn out!
first time candy maker,
Jen
Oh no! Sorry to hear that, Jen. I haven’t seen that before myself, but I found this article, which seems to have some great tips and info on the separation: http://candy.about.com/od/carameltoffee/f/separate_faq.htm Hopefully, that helps! Let me know if I can do anything else to help.
Here’s another article with a lot of tips: http://lindsey-danis.suite101.com/how-to-make-perfect-caramel-a81797 🙂
Thanks Diana! Well I did turn the heat up a bit during the cooking process because I didnt see it getting hotter and I though I had it on too low. I had it on a low medium and then it took forever to increase in temperature so I turned it slightly to a higher medium (not a med. high though) very tiny bit. But I guess that was the problem. Well, I already poured it and it is cooling. I guess I should start over tomorrow. I am hoping to wrap these and give them as gifts in my left over mason jars from my wedding! Hopefully the second time around is better. Should I toss it? I see a clear layer of butter on top of it…..what shall I do? Thanks!
I guess you could cut out a test piece and see if it tastes ok. I’m not really sure. Did either of the articles mention what to do with the result if the caramel separated?
Also, I didnt have an 8×8 pan and used a 7×11, does this change up the recipe?
I don’t think the size difference would make a difference as far as the separation. It should just change the time required to set and will change the size of the end caramel candies. 🙂
Yeh, that’s what I figured. I will taste test them when they are set. The articles mentioned to use them over ice cream. But, i dont eat ice cream. I guess I just will wait and see! I will keep you informed! thanks!
Maybe you can put it over brownies!? 😉
My daughter made the caramels recently while I was visiting her so I wanted to try it. Got everything in the pot & then realized my fairly new candy thermometer did not actually show 245. All I could do then was try the (so-called) “old” method of testing in cold water. And being a senior citizen, I’ve made candy that way before. I didn’t want to overcook it & wind up with something too hard to use. So it won’t completely set up. It could be used for a great sauce, I think, but I’m wondering if I might try cooking it a little longer & see if that works. Has anyone tried that or what do you think. Thanks,
B
Hey B! Thanks for checking out the recipe. 🙂 It does sound like you just need to cook it a little longer. I used the “old” method, too, and it was still a little hard to tell when the caramel was actually ready. The batch photographed in this post was actually a wee bit undercooked, so it set enough to cut, but it was a little softer than I wanted. I think it’s just one of those trial and error things where you have to try it a couple times till you get it. HTH 🙂 Diana
ugh….second attempt fail!!!! Ok, I just noticed that my husband bought the light cream instead of the heavy whipping cream…..could that be the reason for the seperation? I followed all the tips on those pages…..another waste…=(
Oh no! I’m sorry to hear. 🙁 Here’s another forum with some tips and troubleshooting: http://chowhound.chow.com/topics/822515 Maybe you could submit your own thread here to get feedback with people who have more experience than I do? And here’s another site with more helpful tips and feedback: http://www.dummies.com/how-to/content/candy-making-cooking-up-caramels.html
I’m not sure if the light cream made any difference. I tried finding recipes that call for “light cream” to see if it’s normal, but it seems like all the recipes utilizing “light cream” are for caramel frosting, sauce, puddings, etc. So, maybe it was the light cream?
You may want to submit something to Chowhound, though – they seem to have a lot of foodie experts there who may be able to help you better than me. Sorry! 🙁
Hey Jen, Did you by chance try it another time? If it makes you feel better, I’ve totally had a couple caramel fails, too! I only blogged about one, though. lol. It came out hard as a rock! Anywho, don’t feel bad, because caramel is a very tricky thing to make. Happy holidays! 🙂 Diana
Kay so I’ve been reading your recipe like 5 times already and looked for tips on how to do it or what to expect during the process but i’m verry nervous!!
Yesterday i went to buy the ingredients that I was missing but i can’t find heavy cream anywhere!! Ahh!! I have only found table cream and whipping cream. I know that the percentage of fat, water, and everything else is different but i’m not sure what i could use as a substitute for heavy cream and still get a good outcome. Any advice? 😀
Hi Jenny! Do you by chance live in Canada? I was reading a forum online that said that heavy cream apparently isn’t available there. One person said, “Here in Canada, heavy cream does not exist in supermarkets. I use whipping cream (35%) when heavy cream is called for. Heavy cream would have a slightly higher butterfat content than whipping cream.” The forum has other great suggestions and info: http://chowhound.chow.com/topics/368546 . And someone there even posted this amazing chart! http://upload.wikimedia.org/wikipedia/commons/a/ad/Milkproducts.svg HTH and good luck! 🙂
Made caramel for the first time ever! I used this recipe and it turned out AWESOME! Thanks 🙂
Hooray! Nicely done, Dave! 🙂
These are AMAZING!! I found this recipe and was very excited by it given that the title contained the words “caramel,” and “pink,” as well as “salted.” In my haste, I neglected to read any reviews, realized my mistake roughly half way through, and began praying that it would turn out alright, especially since I had never made caramels before. The result was sooo tasty, and I even successfully coated some of these in milk chocolate, which turned out fantastically; I can’t stop eating them. The only problem I had, which was not at all your fault, was that I stupidly assumed that wax paper and parchment paper were comparable, and so the wax paper completely stuck to the candy. Once I finally managed to remove the paper with a rather sharp knife, I was able to try a piece, and let me tell you, it completely justified my extra hour of effort. Thank you so much for your work in creating this recipe, I cannot wait to use it again. Sometime in the future I think I’ll try substituting plain cream with coffee steeped cream, orange flavored cream, and many others.
Hey Lily! So glad to hear that the caramels turned out for you! Sorry about the wax paper, but I’m glad you were able to rescue them! Sounds like you have some tasty, new flavor ideas ahead. Happy cooking! 🙂 Diana
I made a batch of these last week, and everyone went CRAZY for them. 🙂 (I added chopped walnuts instead of the salt on top!) I’m getting ready to make two other batches tomorrow: one using powdered smoked chili pepper and smoked salt, and the other with some bourbon. This caramel recipe base is FABULOUS!!! Thanks a million for sharing!
So glad it worked well for you! Hope the other batches turned out just as delicious. 🙂
Hi Diana! Thanks for sharing this delicious recipe! It was easy until I got around to un-wrapping the candies, and found that all the wax paper wrappers are sticking to the caramel. Is there another type of wrapper that doesn’t stick? Maybe my caramels are just too oily? Would the weather be a significant factor? Any ideas are appreciated. Thanks!
That’s a great question! I’m not exactly sure. Maybe parchment paper would be less sticky? Or perhaps they need to be cooked just a wee bit longer to make them tighten up some? You could try cooking it a tad longer next time perhaps?
I’ve posted about this on my Facebook wall, so hopefully another reader has some tips!
hi Diana i really want to try this it’s look so delicious i just want to know how long i can keep or the expiration of the candy since I’ll be making to sell or give it to my friends. I am not so familiar with this candy.
Thank You
Lowwen
Hi Lowwen, My candies didn’t last very long (because we ate them so fast!), so I’m not sure! lol I would think they’d last at least a week, if not longer. I tried googling for a good authority on this, but I only found people giving advice in various online forums. You may be able to get a more solid answer from a candy cookbook, etc. Sorry I can’t help more. Thanks, Diana
Yum, yum – I have never made candies, but now I really want to try!!!
Just wanted to say this was the easiest candy to make and tasted wonderful – next batch I’m adding dark chocolate and Cointreau…
Glad to hear you liked it! I love your mix-in ideas for your next batch! Happy cooking!
sometimes you have to calibrate a thermometer…usually in ice water to determine whether the thermometer is working properly. Learned that the hard way. Like most of my life lessons. 🙂
Very good point. I was even thinking of making another batch of this soon, and your comment is a good reminder! 🙂