If you haven’t checked into the dough ball craze yet, then now would be a great time to join in. I have a new flavor for you, and it rivals my long time favorite, chocolate chip. But, just what could possibly be better than the classic chocolate chip flavor, you ask?
How about Sugar Cookie! That’s right…Sugar Cookie Dough Balls!
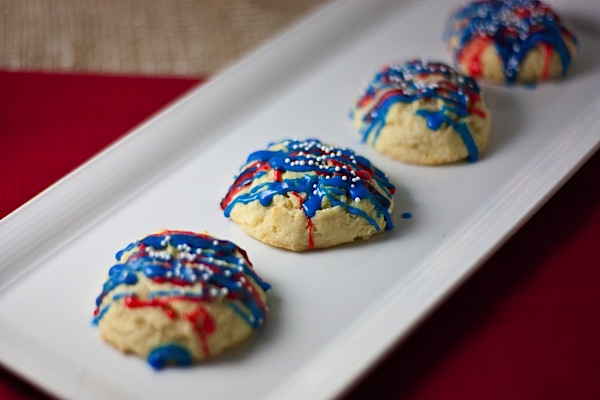
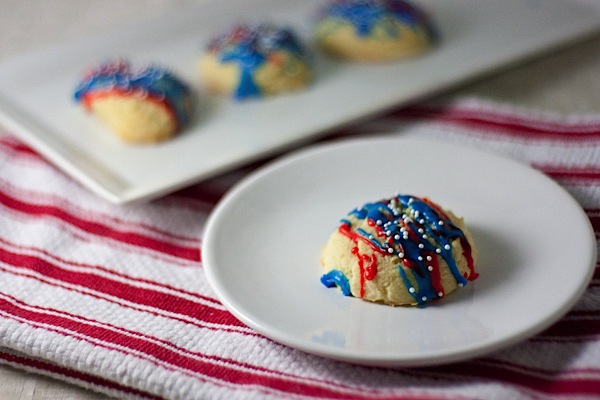
After making those patriotic cupcakes for the Fourth of July, I still wanted to make something else festive. Another easy dessert to decorate is the sugar cookie. Hubba hubba. 😉 But, I figured I’d do it TCL style with a play on the Chocolate Chip Cookie Dough Balls (inspired by the wonderful Annie the Baker).

This recipe is posted using a new method of dough ball baking unlike the kind I’ve used in previous recipes, but I actually think it’s better. I call it “Scoop then Freeze” with the other method being “Chill then Scoop.” If you’ve ever made one of my dough ball recipes, then this totally makes sense. If not, just roll with it. Literally…roll up some dough balls and get your sweet tooth on! 😉
Sugar Cookie Dough Balls Recipe
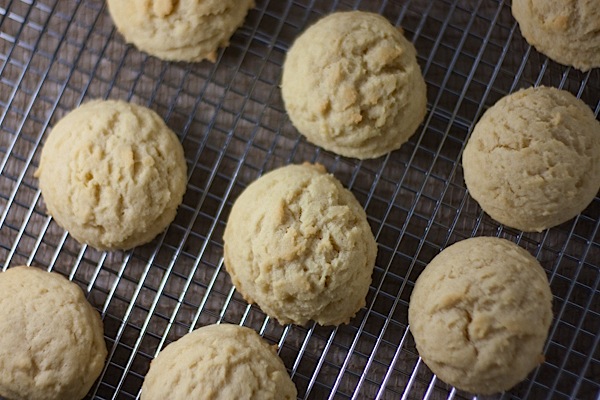
It’s baked like a cookie, but the finished texture is like cookie dough! Just sweet enough, with a pillowy texture inside…try to not eat a whole batch in one sitting! 😉
This version of the recipe uses my “new” method of scooping then freezing. If you prefer to chill, then scoop, check out the instructions at the end of this post or see this post for additional details.
Inspired by Annie the Baker
*Vegan options listed*
Ingredients:
- 1 1/2 cups unbleached all-purpose flour
- 1/2 tsp salt
- 1/4 tsp baking powder
- 1/8 tsp baking soda
- 1/2 cup plus 1 tbsp granulated sugar
- 3/4 stick butter, softened/room-temp (or vegan butter alternative)
- 1 egg (or flaxseed-egg)
- 1/2 tsp vanilla
- Quick Drizzle Frosting, optional, recipe follows
- sprinkles, optional
Directions (Scoop then freeze method):
- Prepare baking sheets with parchment paper.
- In a large bowl, whisk together flour, salt, baking powder, baking soda.
- In a medium bowl, mix sugar and butter till creamy. (I used a handheld mixer, but you could probably just use a whisk). Add egg and vanilla and mix till combined.
- Mix wet into the dry. Note: it will appear there is not enough liquid for the amount of dry ingredients, but continue mixing. It will form into a dough, it will just be a firm dough. See tips on this post (click) for combining. Careful to not overmix. I’ve found pressing the back of a firm, medium/large spatula into the dough seems to work well.
- Use a small sorbet scoop to scoop out dough into small mounds. Spread evenly on a baking sheet, leaving roughly 2-3 inches between each ball. Freeze for at least 30 minutes, though 1 hour is better if you can wait that long. I like to bake half of the dough balls after freezing them for between 1 hour and overnight and save the rest to bake off later at my convenience. 😉
- Pre-heat oven to 400 degrees F. Bake balls for 10-11 minutes, depending on how set you want your centers. If you use egg, and you’re paranoid like me, you can use a meat thermometer to ensure the centers of the balls are at least 160 degrees F, which many web sites say is the safe temp to eat eggs.
- Let your dough balls cool to room temperature.
- Drizzle with frosting (see next recipe) and top with sprinkles, if using.
- Enjoy!
Optional Preparation (Chill then scoop) – follow above directions with these changes:
- Pre-heat oven to 350 degrees F.
- Refrigerate dough for at least 20 minutes before using a small sorbet scoop to scoop out dough into small mounds. Roll each mound into a ball and spread evenly on a baking sheet, leaving roughly 2-3 inches between each ball.
- Bake balls for 10-14 minutes, depending on how set you want your centers. If you use egg, and you’re paranoid like me, you can use a meat thermometer to ensure the centers of the balls are at least 160 degrees F, which many web sites say is the safe temp to eat eggs.
Quick Drizzle Frosting Recipe
This frosting can be made with milk for a more creamy texture, but make it with water so it can sit at room temperature for longer. Add food safe food coloring or gel dye to color frosting for specific party themes or holidays.
Ingredients:
- 1/2 cup powdered sugar
- 1 teaspoon, plus additional 1/4 teaspoon increments water
Directions:
- Whisk powdered sugar and 1 teaspoon water together in a small bowl until combined.
- Add additional water in 1/4 teaspoon increments, whisking to combine each addition, until mixture is thick but liquidy enough to drizzle over cookies.
Be sure to check out my other dough ball flavors and ideas:
Happy Baking!
oooh these look so pretty! great job. 🙂
Mmmmmmm…. these look delicious! And so pretty.
Yummm! Thanks for the recipe! Sugar cookies may be my favorite cookie. I’ll be making these soon.
Yay! Let me know what you think Laura! 🙂
i’ve had your dough balls on my ‘to make’ list FOREVER…and seeing this reminds me i need to get on that asap! these look fabulous!
Once you go dough ball, you never go back! 😉 haha jk But they are really, really good! Which flavor do you want to make first?
I’ve loved all your dough ball creations before so I will definitely be trying this one out too!
Sweet! Thanks Gina! 🙂
Yummmmmmm – can you bring some of these over to me? I could REALLY go for this right now 🙂
Hahaha…wouldn’t home-delivery be fab? 😉
These look amazing! Sugar Cookies are my fav. I personally love Snickerdoodles but anything involving frosting is most certainly high on my list 🙂
I have Snickerdoodles on my to-bake list! Well, Snickerdoodle dough balls, that is. What other frosting-y desserts do you like?
Those look SOOO yummy!! I’ll have to make some 🙂
Look so, so good!
Your directions for the scoop then freeze method don’t mention the actual freezing part…I’m guessing it comes after the scooping, but for how long?! 🙂
You’re right! Sorry about that. That’s what I get for typing out recipes right before bedtime. hehe. I’ve updated the recipe: https://thechiclife.com/2011/07/sugar-cookie-dough-balls-with-quick-drizzle-frosting.html
Basically, you want to freeze them for between 1 hour and overnight. But, I’ve found they last a bit longer in the freezer if you want to have dough balls at your convenience! 😉 Mine didn’t last a week, though.
Cookies! YUMMY!
I made these today and they are awesome! So soft and chewy — and the drizzle icing is so fun! I put in a little vanilla too and it turned out super delish.
Woohoo! So glad you liked them Caroline! I like how you added vanilla to your frosting. Nice touch! 🙂
I made these today they turned out perfect thankyou!!!
Thank you for checking out my recipe. Glad to hear you enjoyed them! 🙂
I’m making these this afternoon and just wondered if you could tell me approximately how many dough balls this will make… thanks!!
You would think with all the times I’ve made these that I would count them or something. lol. I believe it makes between 16-18 depending on the size of your scoop and how tight you fill it. Hope this helps and thanks for checking out my recipe! Happy baking! 🙂
Oh my goodness, so yummy!! I was able to get 24 out of this, which is perfect for the use I have. And confession time: I have the butterscotch oatmeal dough chilling in the fridge right now! Thanks so much, again!
Oh nice! Glad to hear they turned out and made 24!
Hope the butterscotch turns out just as yummy. 🙂
Thank you, too! Have a great rest of the weekend!
They’re both great! I find butterscotch chips too sweet for me but I’m sure these will be a hit. I think I might cook both types a little shorter (I went the full 14 min), as they seem to set up some more while cooling.
Thanks again for sharing. Delicious!
They definitely do set up as they cool. I like them best when they’re completely cooled or even the next day when they’re really set. It’s fun to play with the timing till they get to the texture you like. 🙂 Enjoy!
I’ll for sure be playing with the sugar cookie dough. That seems to be my new fave cookie since I stopped eating chocolate (I went off all caffeine, including cocoa products). I’m proud of myself for not having devoured the whole batch… yet!
BTW, I have your maple dijon baked tempeh bookmarked and plan to make it very soon. I’ll report back about that as well.
Sounds great! Btw, re: chocolate, have you ever tried carob? According to this article, it doesn’t contain caffeine (though there is something similar that can be in it). Here’s an article I found with more details: http://www.foodreference.com/html/fcarob.html
Hope you like the tempeh!
I have had carob but many years ago, and had never even thought of it as an alternative lately. I’ll have to look into it. Thanks so much for the helpful article!
I love carob…but just because I like the taste. I like chocolate, too. Anywho, glad you liked the article. Here’s another: http://www.livestrong.com/article/274337-does-carob-have-caffeine/ I’m sure there are tons more online. Oh, and did you know they make carob chips!? 😉
Sure thing, and thank YOU!
I am so thankful I found your recipe! I don’t bake or cook well but I do enough to get buy for my family of 5. I usually bake with cookie mixes since I always felt like it was so much easier. However, when I actually took the time to look at the homemade cookie instructions I realized that a lot of the packages are only saving me 2 to 3 ingredients but costing me way more (wallet and health). So, I have been researching. I found your blog today and tried this recipe tonight. My 1st grader is celebrating St. Patrick’s Day early tomorrow so I added a drop of green food coloring to the dough and kneaded it with my hands gently until it mixed to a pretty mint green. They look beautiful and taste soooo yummy! I am having to force myself to send these to his school for their party. Thanks for all of your time and effort to get the recipe just right!
Those aren’t sugar cookie dough balls. I’ve made sugar cookie dough balls. They taste more like sugar bread.
My friend said they tasted like Mexican wedding cakes